Astro v2.1で、AstroにMarkdocを適用できる@astrojs/markdocがリリースされた。
この記事では、@astrojs/markdocの導入方法と、MarkdocのNodeやTagの実装方法を説明する。

なおAstroにMarkdocを導入する別の手段には、サードパーティ製のastro-markdoc-rendererというパッケージを使う方法もある。
astro-markdoc-rendererを使ってみた記事は以下に書いた。
Astro で Markdoc を使う(astro-markdoc-renderer)
Markdocの機能
Markdocの機能を使うと、Astro製のWebサイトで次のことを実現できる。
- Function
Markdown内に関数を追加できる
Astro のドキュメントでは、国名から絵文字に変換する関数の実装例を紹介している
関数はMarkdownの中で{% 関数名("引数") />のように書く
参考:Functions - Markdoc - Node
MarkdownシンタックスからHTMLにレンダリングするときの処理をカスタマイズして、出力結果を変更できる
たとえば見出しタグにヘッダーリンクを付けたい場合にNodeを利用する
参考:Nodes - Markdoc - Tag
mdx形式でコンポーネントを使ってMarkdownを拡張できるように、Markdownシンタックスでは記述できない複雑なDOMを生成できる
Markdocの場合は{% タグ名 属性="値" />{% /タグ名 />のように書く
参考:Tags - Markdoc
使うときのポイント
@astrojs/markdocをインストールし、Astroの設定ファイル(astro.config.mjs)のintegrationに設定する- MarkdocのNodeやTagの設定は、Astroの設定ファイルに定義する
- MarkdocのNodeやTagで利用するコンポーネントは、Content Collections APIの
render()関数で生成したドキュメントコンポーネントに渡す
ブログサイトを作成してみる
AstroのBlogテンプレートに対して、@astrojs/markdocを導入してみる。
STEP1:Astroプロジェクトの作成
npm create astroコマンドでAstroプロジェクトを作成する。
$ npm create astro@latest -- --template blog

╭─────╮  Houston:
│ ◠ ◡ ◠  Initiating launch sequence... right... now!
╰─────╯

 astro   v2.1.3 Launch sequence initiated.

✔ Where should we create your new project? … galactic-gamma
✔ Install dependencies? … yes
✔ Do you plan to write TypeScript? … yes
✔ How strict should TypeScript be? … Strict
✔ Initialize a new git repository? … yes
STEP2:@astrojs/markdocのインストール
npx astro add markdocを使って、@astrojs/markdocを導入する。
$ npx astro add markdoc

 ╭───────────────────────────────╮
 │ npm install @astrojs/markdoc  │
 ╰───────────────────────────────╯
✔ Continue? … yes

Astro will make the following changes to your config file:
# 略
✔ Continue? … yes

  success  Added the following integration to your project:
  - @astrojs/markdoc
このコマンドを実行すると、次のことが行なわれる。
-
依存パッケージに
@astrojs/markdocが追加される -
Astroの設定ファイルに
@astrojs/markdocを利用する設定が追記されるastro.config.mjsimport { defineConfig } from 'astro/config'; import mdx from '@astrojs/mdx'; import sitemap from '@astrojs/sitemap'; + import markdoc from "@astrojs/markdoc"; // https://astro.build/config export default defineConfig({ site: 'https://example.com', - integrations: [mdx(), sitemap()] + integrations: [mdx(), sitemap(), markdoc()] });
STEP3:Nodeの実装
今回は、aタグに対して、href属性の値が「http」始まりなら別タブで開くような処理を差し込む。
やることは次の3つ。
- Astroの設定ファイルにMarkdocの設定を追記する
- 呼び出すコンポーネントを作成する
- ドキュメントコンポーネントに作成したコンポーネントを渡す
まずは、Astroの設定ファイルに、独自処理を差し込むHTMLタグと、コンポーネントで受け取るHTMLタグの属性の設定を記載する。
受け取りできるHTMLタグの属性は、Optionsで確認できる。
今回は、href属性だけを使うので、attributesプロパティにhrefを定義する。
renderには、後で作成するコンポーネント名を指定する。
// ...略
import markdoc from "@astrojs/markdoc";

+ const nodes = {
+    link: {
+     render: "Link",
+     attributes: {
+       href: { type: String },
+     },
+   }
+ }

// https://astro.build/config
export default defineConfig({
  site: "https://example.com",
-   integrations: [mdx(), sitemap(), markdoc()]
+   integrations: [mdx(), sitemap(),
+     markdoc({
+       nodes
+     })]
});
次にLinkコンポーネントを作成する。
HTMLタグの属性はAstro.props経由で受け取る。
---
type Props = {
  href: string;
};
const { href, title } = Astro.props;
const target = href.startsWith("http") ? "_blank" : null;
const rel = target ? "noopener noreferrer" : null;
---

<a href={href} target={target} rel={rel}>
  <slot />
</a>
最後に、作成したコンポーネントを利用する設定を追記する。
render()で生成されるドキュメントコンポーネントに対し、componentsプロパティに作成したコンポーネントを渡す。
import { CollectionEntry, getCollection } from "astro:content";
import BlogPost from "../../layouts/BlogPost.astro";
+ import Link from "../../components/markdoc/Link.astro";
// 略
const { Content } = await post.render();
---

 <BlogPost {...post.data}>
  <h1>{post.data.title}</h1>
-   <Content />
+   <Content components={{ Link }} />
 </BlogPost>
STEP4:Tagの実装
注意書きブロックのような背景色のついたパーツとしてcalloutタグを作成してみる。
Tagの実装もNodeと同様の流れで実装する。
まずはAstroの設定ファイルに独自タグの設定を記載する。
タグから受け取る属性をattributesプロパティに定義し、renderには後で作成するコンポーネント名を指定する。
// ...略
import markdoc from "@astrojs/markdoc";

const nodes = {
 // 略
};

+ const tags = {
+   callout: {
+     render: "Callout",
+     attributes: {
+       type: { type: String },
+       title: { type: String }
+     }
+   },
+ }

// https://astro.build/config
export default defineConfig({
  site: "https://example.com",
   integrations: [mdx(), sitemap(),
     markdoc({
       nodes,
+      tags,
     })]
});
次にcalloutタグの中身を実装する。
typeの値に応じて背景色やアイコンを変更できるようにしてみた。
---
export interface Props {
  type: "note" | "reference" | "caution";
  title: string;
}

const labelByType = {
  note: "Note",
  reference: "Reference",
  caution: "Caution",
};

const { type = "note", title } = Astro.props as Props;

// Icon using https://primer.style/design/foundations/icons/
const icons: Record<
  NonNullable<Props["type"]>,
  { viewBox: string; d: string }
> = {
  note: {
    viewBox: "0 0 16 16",
    d: "M0 1.75A.75.75 0 0 1 .75 1h4.253c1.227 0 2.317.59 3 1.501A3.743 3.743 0 0 1 11.006 1h4.245a.75.75 0 0 1 .75.75v10.5a.75.75 0 0 1-.75.75h-4.507a2.25 2.25 0 0 0-1.591.659l-.622.621a.75.75 0 0 1-1.06 0l-.622-.621A2.25 2.25 0 0 0 5.258 13H.75a.75.75 0 0 1-.75-.75Zm7.251 10.324.004-5.073-.002-2.253A2.25 2.25 0 0 0 5.003 2.5H1.5v9h3.757a3.75 3.75 0 0 1 1.994.574ZM8.755 4.75l-.004 7.322a3.752 3.752 0 0 1 1.992-.572H14.5v-9h-3.495a2.25 2.25 0 0 0-2.25 2.25Z",
  },
  reference: {
    viewBox: "0 0 16 16",
    d: "m7.775 3.275 1.25-1.25a3.5 3.5 0 1 1 4.95 4.95l-2.5 2.5a3.5 3.5 0 0 1-4.95 0 .751.751 0 0 1 .018-1.042.751.751 0 0 1 1.042-.018 1.998 1.998 0 0 0 2.83 0l2.5-2.5a2.002 2.002 0 0 0-2.83-2.83l-1.25 1.25a.751.751 0 0 1-1.042-.018.751.751 0 0 1-.018-1.042Zm-4.69 9.64a1.998 1.998 0 0 0 2.83 0l1.25-1.25a.751.751 0 0 1 1.042.018.751.751 0 0 1 .018 1.042l-1.25 1.25a3.5 3.5 0 1 1-4.95-4.95l2.5-2.5a3.5 3.5 0 0 1 4.95 0 .751.751 0 0 1-.018 1.042.751.751 0 0 1-1.042.018 1.998 1.998 0 0 0-2.83 0l-2.5 2.5a1.998 1.998 0 0 0 0 2.83Z",
  },
  caution: {
    viewBox: "0 0 16 16",
    d: "M4.47.22A.749.749 0 0 1 5 0h6c.199 0 .389.079.53.22l4.25 4.25c.141.14.22.331.22.53v6a.749.749 0 0 1-.22.53l-4.25 4.25A.749.749 0 0 1 11 16H5a.749.749 0 0 1-.53-.22L.22 11.53A.749.749 0 0 1 0 11V5c0-.199.079-.389.22-.53Zm.84 1.28L1.5 5.31v5.38l3.81 3.81h5.38l3.81-3.81V5.31L10.69 1.5ZM8 4a.75.75 0 0 1 .75.75v3.5a.75.75 0 0 1-1.5 0v-3.5A.75.75 0 0 1 8 4Zm0 8a1 1 0 1 1 0-2 1 1 0 0 1 0 2Z",
  },
};
const { viewBox, d } = icons[type];
---

<div class={`callout ${type}`}>
  <p class="title">
    <span class="icon">
      <svg
        xmlns="http://www.w3.org/2000/svg"
        viewBox={viewBox}
        width={16}
        height={16}
      >
        <path d={d}></path>
      </svg>
      <span>{title}</span>
    </span>
  </p>
  <slot />
</div>

<style>
  .callout {
    border-radius: 0.375rem;
    background-color: #c2f2f9;
    padding: 0.5rem 1rem;
  }
  .title {
    font-weight: 800;
  }
  .icon svg {
    vertical-align: middle;
  }
  .icon svg + span {
    margin-left: 0.25rem;
  }
  .reference {
    background-color: #dbceed;
  }
  .caution {
    background-color: #f7f1d7;
  }
</style>
最後に、作成したコンポーネントをドキュメントコンポーネントに渡す設定を追記する。
import { CollectionEntry, getCollection } from "astro:content";
import BlogPost from "../../layouts/BlogPost.astro";
import Link from "../../components/markdoc/Link.astro";
+ import Callout from "../../components/markdoc/Callout.astro";
// 略
const { Content } = await post.render();
---

 <BlogPost {...post.data}>
  <h1>{post.data.title}</h1>
-   <Content components={{ Link }} />
+   <Content components={{ Link, Callout }} />
 </BlogPost>
STEP5:動作の確認
テスト用の記事を追加して、動作を確認する。
以下を確認できればOK。
- 「http」始まりのリンクのときは、別タブで開くこと
- calloutタグがレンダリングされていること
テスト用の記事を追加する
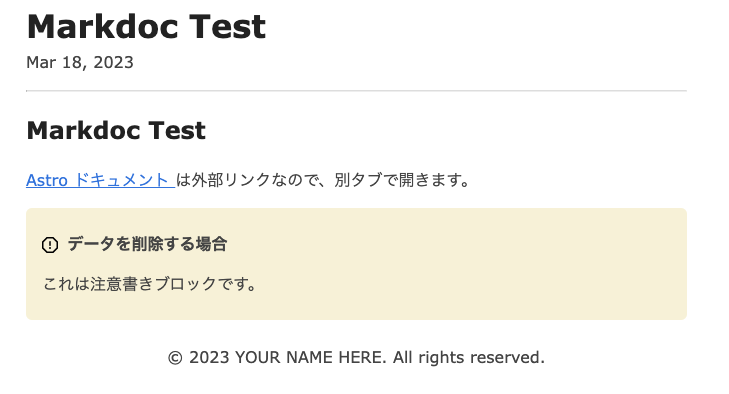
テスト用の記事として、拡張子が.mdocのファイルを追加する。
---
title: "Markdoc Test"
description: "This is test page"
pubDate: "March 18 2023"
heroImage: ""
---

[Astro ドキュメント](https://docs.astro.build/) は外部リンクなので、別タブで開きます。

<Callout type="caution" title="データを削除する場合">

これは注意書きブロックです。

</Callout>
ローカルサーバーを起動する
npm run devでローカルサーバーを起動する。
$ npm run dev
2023 年 3 月 22 日追記
その後リリースされたAstro v2.1.4で、下記のビルドエラーの問題が解決されたことを確認した。
2023年3月17日時点でのAstro最新版v2.1.3では、ローカルサーバーの起動やビルドするときに「child is not defined」というエラーが発生していた。
error   child is not defined
ReferenceError: child is not defined
    at default (file:///Users/chick-p/works/galactic-gamma/dist/chunks/markdoc.55a74723.mjs:93:71)
    at renderSlot (file:///Users/chick-p/works/galactic-gamma/dist/chunks/astro.70834fa5.mjs:1129:64)
    at renderFragmentComponent (file:///Users/chick-p/works/galactic-gamma/dist/chunks/astro.70834fa5.mjs:1812:26)
    at renderComponent (file:///Users/chick-p/works/galactic-gamma/dist/chunks/astro.70834fa5.mjs:1831:12)
    at file:///Users/chick-p/works/galactic-gamma/dist/chunks/markdoc.55a74723.mjs:91:495
    at AstroComponentInstance.RenderNode [as factory] (file:///Users/chick-p/works/galactic-gamma/dist/chunks/astro.70834fa5.mjs:389:12)
このエラーは、Astroが依存する@astrojs/compilerによるものだった。
@astrojs/compilerのバージョンをv1.2.1からv1.2.0に変更すると、ビルドが通るようになる。
具体的には、package.jsonのoverridesプロパティを使って依存パッケージのバージョンを固定し、もう一度npm installする。
  "overrides": {
    "@astrojs/compiler": "1.2.0"
  },
ローカルサーバーを起動したら、http://localhost:3000/blog/blog/markdoc/にアクセスして表示を確認する。
<Callout type="caution" title="データを削除する場合" />の部分が、Callout.astroで実装した内容に置き換わっている。
リンク部分も、別タブで開くようにtargetが設定されていることも確認できた。
所感
@astrojs/markdocはまだ実験的な機能で、Markdocの機能すべてを利用できない。
たとえば次のような制限がある。
- Markdocを適用できるコンテンツファイルの拡張子は、
.mdocのみ - NodeやTagでは
transform関数を利用できない
transform関数は、NodeやTagのコンポーネントに渡す前に属性の値や要素自体を前処理できる機能である
たとえば今回作成したaタグの書き換えは、本来はコンポーネントを使わずにtransform関数だけで実現できる
このブログは、Astroとastro-markdoc-rendererを使っているが、@astrojs/markdocに移行するにはまだ早いなと感じた。
ただ、@astrojs/markdocは公式から提供されているという安心感があるので、今後の進化に期待している。
参考情報
動作を確認したパッケージのバージョンは次のとおり。
- astro v2.1.4
- @astrojs/markdoc v0.0.3