Astro v2.1でMarkdocのインテグレート@astrojs/markdocがリリースされた。
@astrojs/markdoc
@astrojs/markdocを試してみた内容は@astrojs/markdoc を使って Astro 製のブログに Markdoc を導入してみたに書いた。
astro-markdoc-rendererという、Astroで構築したブログにMarkdocを組み込めるライブラリを見つけたので、Astro + Markdocの構成でブログを作ってみる。
かんたんのため、Astroブログサイトの構築にはAstroのBlogテンプレートを使う。
AstroでMarkdocを使いたい
このブログは、現時点ではMarkdocを使ってMarkdoc + Next.jsの構成で構築している。
Markdocには、次の使いやすさを感じている。
- HTMLタグに独自フックを差し込める
- 独自コンポーネントを利用する際、記事にHTMLタグを書く必要がなく、可読性が高くなる
一方、Astroは2022 JavaScript Rising StarsのSSG部門で2位にランクインしていて、2023年現在注目されているSSGツールである。
Astroでは、できる限りコンポーネントを静的生成し、レンダリング時には最低限のJavaScriptだけが実行される。
そのためページの読み込みが高速になる。
Astroのメリットを享受しつつ、Markdocの機能を使いたいと思ったので、astro-markdoc-rendererを試してみる。
STEP1:Astroプロジェクトの作成
Astroプロジェクトを作成する。
$ npm create astro@latest -- --template blog

╭─────╮  Houston:
│ ◠ ◡ ◠  Keeping the internet weird since 2021.
╰─────╯

 astro   v1.9.1 Launch sequence initiated.

✔ Where would you like to create your new project? … my-blog
✔ Would you like to install npm dependencies? (recommended) … yes
✔ Would you like to initialize a new git repository? (optional) … yes
✔ How would you like to setup TypeScript? › Strict
現時点でのディレクトリ構成は次の通り。
.
├── README.md
├── astro.config.mjs
├── node_modules
├── package-lock.json
├── package.json
├── public
├── src
│   ├── components
│   │   ├── BaseHead.astro
│   │   ├── Footer.astro
│   │   ├── Header.astro
│   │   └── HeaderLink.astro
│   ├── config.ts
│   ├── env.d.ts
│   ├── layouts
│   │   └── BlogPost.astro
│   ├── pages
│   │   ├── about.md
│   │   ├── blog
│   │   │   ├── first-post.md
│   │   │   ├── markdown-style-guide.md
│   │   │   ├── second-post.md
│   │   │   ├── third-post.md
│   │   │   └── using-mdx.mdx
│   │   ├── blog.astro
│   │   ├── index.astro
│   │   └── rss.xml.js
│   └── styles
└── tsconfig.json
STEP2:必要なパッケージのインストール
必要なパッケージをインストールする。
$ npm install @markdoc/markdoc astro-markdoc-renderer gray-matter
STEP3:Markdocの設定ファイルの作成
次の内容で、src/lib/markdoc/markdoc.config.tsを作成する。
Markdocの独自タグやHTMLタグのフックに関する設定は、後のSTEPで追記する。
import Markdoc from "@markdoc/markdoc";
import type { Config } from "@markdoc/markdoc";

const { nodes, Tag } = Markdoc;

export const config: Config = {
  tags: {},
  nodes: {},
};
STEP4:astro-markdoc-rendererの利用
コンテンツを表示する際に、astro-markdoc-rendererが適用されるようにする。
Blogテンプレートにおいては、コンテンツ表示にBlobPost.astroが使われている。
そのため、BlobPost.astroでMarkdocRendererを利用する。
-
次の内容で、
src/components/Renderer.astroを作成する。src/components/Renderer.astro--- import { MarkdocRenderer } from "astro-markdoc-renderer"; import type { Content } from "astro-markdoc-renderer"; type Props = { content: Content; }; const { content } = Astro.props; const components = {}; --- <MarkdocRenderer content={content} components={components} /> -
次の内容で
src/lib/post.tsを作成する。
Astroでは、Markdownのコンテンツは、<slot />に展開される。
MarkdocRendererのcontentには、Markdocを通したコンテンツを渡す必要があるため、readPost()でその処理を実施する。src/lib/post.tsimport fs from "fs/promises"; import matter from "gray-matter"; import Markdoc from "@markdoc/markdoc"; import { config } from "./markdoc/markdoc.config"; export async function readPost({ filepath }: { filepath: string }) { const rawString = await fs.readFile(filepath, "utf8"); const { content } = matter(rawString); const ast = Markdoc.parse(content); const errors = Markdoc.validate(ast, config); if (errors.length) { console.error(errors); } return { content: Markdoc.transform(ast, config), }; } -
src/layouts/BlobPost.astroを次のように修正する。
先ほど作成したRendererに、Markdocを通したコンテンツを渡す。src/layouts/BlobPost.astro--- import BaseHead from '../components/BaseHead.astro'; import Header from '../components/Header.astro'; import Footer from '../components/Footer.astro'; + import Renderer from "../components/Renderer.astro"; + import { readPost } from '../lib/post'; export interface Props { content: { title: string; description: string; pubDate?: string; updatedDate?: string; heroImage?: string; + file: string; }; } const { + content: { title, description, pubDate, updatedDate, heroImage, file }, - content: { title, description, pubDate, updatedDate, heroImage }, } = Astro.props; + const { content } = await readPost({ + filepath: file + }); --- // 省略 <main> <article> {heroImage && <img width={720} height={360} src={heroImage} alt="" />} <h1 class="title">{title}</h1> {pubDate && <time>{pubDate}</time>} { updatedDate && ( <div> Last updated on <time>{updatedDate}</time> </div> ) } <hr /> - <slot /> + <Renderer content={content} slot="content" /> </article> </main> // 省略
STEP5:HTMLタグへのフックの追加
Markdocでは、MarkdownシンタックスからHTMLタグを生成するときに、独自の処理を差し込むことができる。
参考:Nodes
今回は、hrefの値がhttp始まりなら別タブで開くような処理を差し込む。
ts:src/lib/markdoc/markdoc.config.tsのnodesに、HTMLタグ生成時に差し込む処理を追加する。
// 省略

export const config: Config = {
  tags: {},
-  nodes: {},
+  nodes: {
+    link: {
+      children: ["inline"],
+      attributes: {
+        href: { type: String },
+        target: { type: String },
+        rel: { type: String },
+      },
+      ...nodes.link,
+      transform(node, config) {
+        const attributes = node.transformAttributes(config);
+        const target = attributes.href.startsWith("http") ? "_blank" : null;
+        const rel = target ? "noopener noreferrer" : null;
+        return new Tag(
+          this.render,
+          { ...attributes, target, rel },
+          node.transformChildren(config)
+        );
+      },
+    },
+  },
};
STEP6:独自タグの追加
Markdocでは、独自タグを実装し、{% TAG />のような記法をMarkdownに記述することで、シンタックスでは記述できない複雑なDOMを表現できる。
参考:Tags
今回は、背景色のついた注意書きブロックタグを作成する。
-
次の内容で
src/components/Callout.astroを追加する。src/components/Callout.astro--- type Props = { title: string; }; const { title } = Astro.props; --- <style> .callout { border-radius: 0.375rem; background-color: #ccc; padding: 0.5rem 1rem; } .callout--title { font-weight: 800; } .callout--content { } </style> <div class="callout"> <div class="callout--title"> {title} </div> <div class="callout--content"><slot /></div> </div> -
ts:src/lib/markdoc/markdoc.config.tsを次のように書き換える。src/lib/markdoc/markdoc.config.ts// 省略 export const config: Config = { - tags: {}, + tags: { + callout: { + render: "Callout", + attributes: { + title: { type: String }, + }, + children: nodes.document.children, + }, + }, nodes: { // 省略... };
STEP7:テストページの追加
次の内容でpages/blog/markdoc-test.mdを追加する。
---
layout: "../../layouts/BlogPost.astro"
title: "Markdoc のテスト"
description: "Markdoc のテストです"
pubDate: "July 8 2023"
---

## リンク

[Google](https://google.co.jp) は外部リンクなので、別タブで開きます。
[Home](/) は内部リンクなので、同じタブで開きます。

## Callout

<Callout title="タイトル" >

注意書きです。**太字** もできます。

</Callout>
STEP8:動作確認
ローカルサーバーを起動して、テストページを確認する。
$ npm run dev

> @example/blog@0.0.1 dev
> astro dev

  🚀  astro  v1.9.1 started in 600ms

  ┃ Local    http://localhost:3000/
  ┃ Network  use --host to expose
<Callout title="タイトル" />を記述した部分が、Callout.astroで実装した内容に置き換わっている。
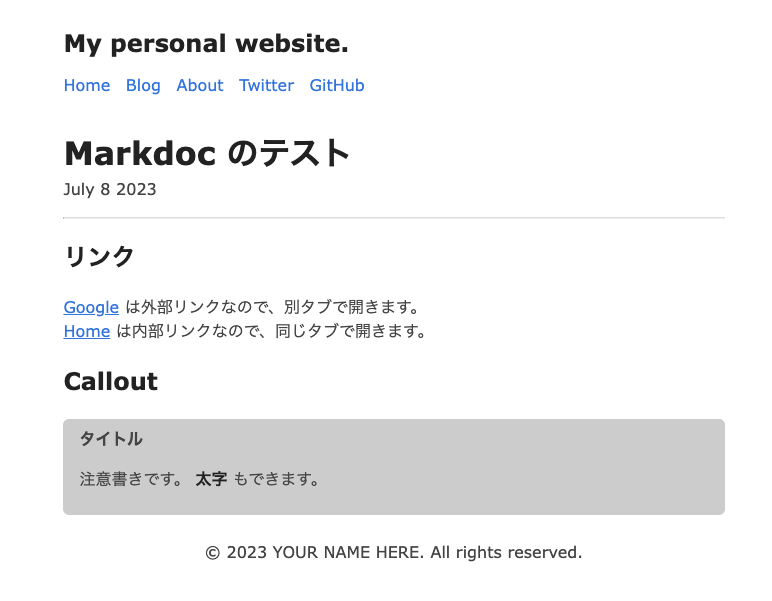
リンクについては、外部リンクは別タブで開くようにtargetが設定されていることも確認できた。
<h2>リンク</h2>
<p>
  <a href="https://google.co.jp" target="_blank" rel="noopener noreferrer">Google</a> は外部リンクなので、別タブで開きます。<br>
  <a href="/">Home</a> は内部リンクなので、同じタブで開きます。
</p>
参考情報
最終的なディレクトリ構成は次の通り。
.
├── README.md
├── astro.config.mjs
├── node_modules
├── package-lock.json
├── package.json
├── public
├── src
│   ├── components
│   │   ├── BaseHead.astro
│   │   ├── Callout.astro <== 追加
│   │   ├── Footer.astro
│   │   ├── Header.astro
│   │   ├── HeaderLink.astro
│   │   └── Renderer.astro <== 追加
│   ├── config.ts
│   ├── env.d.ts
│   ├── layouts
│   │   └── BlogPost.astro <== 修正
│   ├── lib
│   │   ├── markdoc
│   │   │   └── markdoc.config.ts <== 追加
│   │   └── post.ts <== 追加
│   ├── pages
│   │   ├── about.md
│   │   ├── blog
│   │   │   ├── first-post.md
│   │   │   ├── markdoc-test.md <== 追加
│   │   │   ├── markdown-style-guide.md
│   │   │   ├── second-post.md
│   │   │   ├── third-post.md
│   │   │   └── using-mdx.mdx
│   │   ├── blog.astro
│   │   ├── index.astro
│   │   └── rss.xml.js
│   └── styles
└── tsconfig.json
所感
astro-markdoc-rendererを使うと、Astro + Markdocの構成が実現できた。
現在のNext.jsを使った構成から移行する場合も、コンテンツに関してはそのまま使えそう。