2022年の10月にVercelがEdge Function上で動くOGP画像を生成するためのライブラリとして、@vercel/ogを公開した。
これによりvercel/og-imageが抱えていた実行時間が遅さやPuppeteerに依存することで起こりやすかったエラーなどの問題を解決している。
また、@vercel/ogはNext.jsアプリケーションと共存できるため、OGP画像を生成するためのアプリケーションを別途用意する必要がない。
この記事では、Netlify Edge Functions上で @vercel/ogを動かす方法について説明する。
Netlify Edge Functionsの詳細は、以前書いた記事を参考にしてほしい。
Netlify Edge Functions で Web ページの OGP データを取得する関数を作る
Netlify Edge Functions上でNext.jsを動かす
Netlify Edge Functions上でNext.jsのアプリケーションを動かすには、@netlify/plugin-nextjsが必要である。
このプラグインを使うと、Netlify上でNext.jsアプリケーションのサーバーサイドレンダリングが可能になる。

使歌目の設定はかんたんで、Netlifyの設定ファイル(netlify.toml)に以下を記述するだけでよい。
[[plugins]]
  package = "@netlify/plugin-nextjs"
OGP画像を返すエンドポイントを実装する
前提として、Next.jsのアプリケーションは存在しているものとする。
まずはローカルでデバッグするためにNetlify CLIをインストールしておく。
$ npm i -D netlify-cli
今回の主役である@vercel/ogをインストールする。
$ npm i @vercel/og
OGP画像を生成するエンドポイントは、Vercel公式で案内しているコードを参考にする。
Dynamic text generated as image
- OGP画像の推奨サイズである横1200px、縦630pxの要素が返されるようにする。
- 記事タイトルに応じてOGP画像の文字を変更したいため、URLクエリパラメーターの
t=で受け取れるようにする。
import { ImageResponse } from "@vercel/og";
import type { NextRequest } from "next/server";
export const config = {
runtime: "experimental-edge",
};
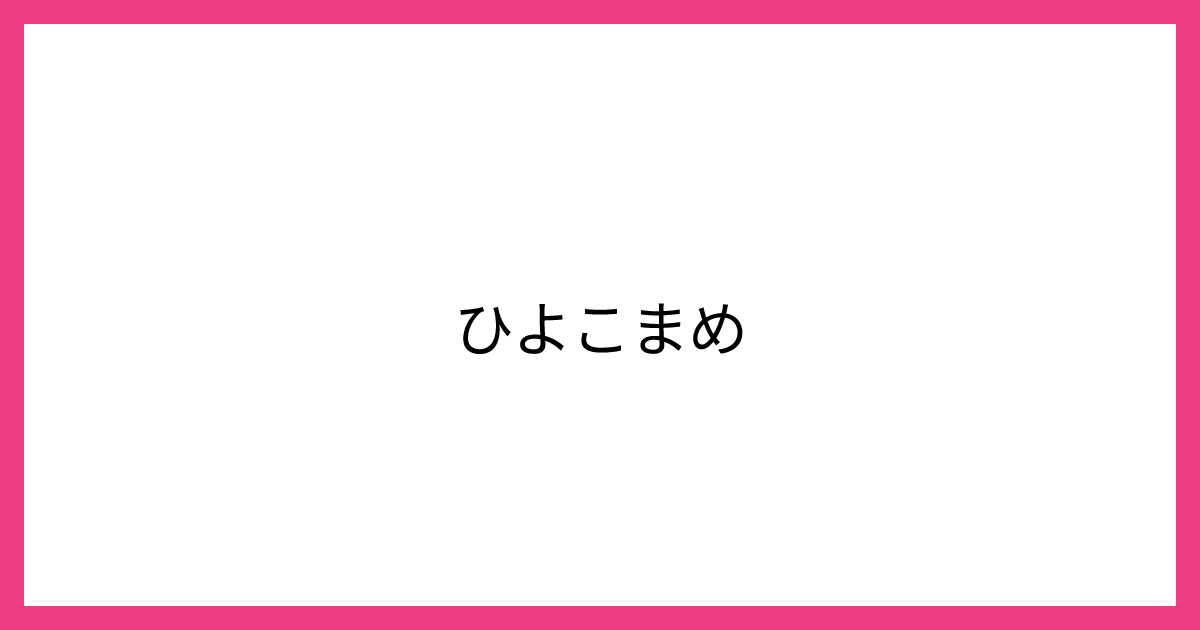
const siteName = "ひよこまめ";
export default function handler(req: NextRequest) {
try {
const { searchParams } = new URL(req.url);
const hasTitle = searchParams.has("t");
const title = hasTitle
? searchParams.get('t')?.slice(0, 100)
: siteName;
const image = new ImageResponse(
(
<div
style={{
display: "flex",
fontSize: 40,
color: "black",
background: "white",
width: "100%",
height: "100%",
textAlign: "center",
justifyContent: "center",
alignItems: "center",
border: "24px solid #ef3d81",
}}
>
<div
style={{
fontSize: 60,
fontStyle: "normal",
letterSpacing: "-0.025em",
color: "black",
marginTop: 30,
padding: "0 120px",
lineHeight: 1.4,
whiteSpace: "pre-wrap",
}}
>
{title}
</div>
</div>
),
{
width: 1200,
height: 630,
}
);
return image;
} catch (e: any) {
console.log(`${e.message}`);
return new Response(`Failed to generate the image`, {
status: 500,
});
}
}
最後にNetlifyの設定ファイルを作成する。
[build]
command = "next build"
base = "."
publish = ".next"

[[plugins]]
package = "@netlify/plugin-nextjs"
動作確認
Netlify CLIを使用してローカルサーバーを起動する。
$ npx nelify dev
http://localhost:8888/api/ogにアクセスすると、siteNameに設定した文字列を埋め込んだ画像が表示される。
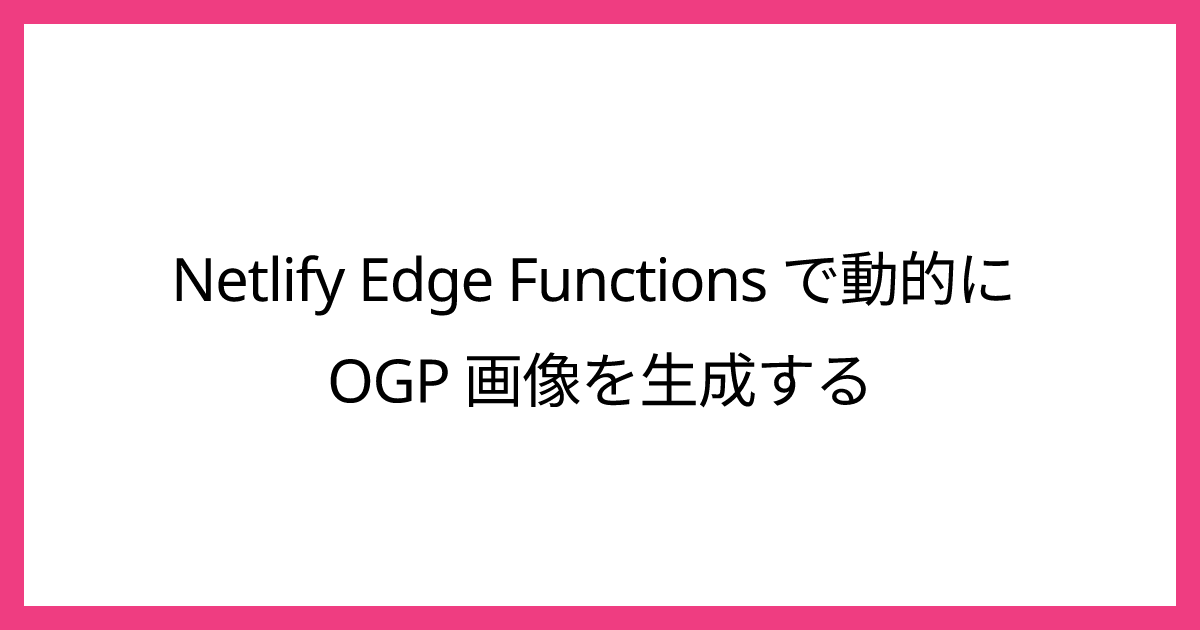
次に、クエリパラメータtにタイトルを設定してアクセスする。
例:http://localhost:8888/api/og?t=Netlify Edge Functions で動的に OGP 画像を生成する
あとは、これらの内容をコミットしてリポジトリにPushすることで、Netlifyサイト上でも同じエンドポイントでOGP画像が表示されるようになる。
OGP画像を利用する
ブログの記事に対してOGPを設定するには、記事タイトルを渡したエンドポイントをmetaタグに設定すればよい。
export function SEO({ siteConfig, description ,title }) {
  return (
    <>
      <meta name="title" content={title} />
      <meta name="description" content={description} />
      <meta property="og:image" content={`/api/og?t=${title}`} />
      <meta property="og:site_name" content={siteConfig.title} />
      <meta property="og:url" content={siteConfig.url} />
      <meta property="og:type" content="website" />
      <meta property="og:title" content={title} />
      <meta property="og:description" content={description} />
    </>
  );
}
参考情報
動作を確認したときのパッケージのバージョンは次のとおり。
- @vercel/og v0.4.0
- Next.js v12.3.4
- @netlify/plugin-nextjs v4.32.1